There are
0
items
in your cart

LED & Red Light Therapy Before & After Results
When considering using LED red light therapy, some of the most commonly asked questions are: Does LED red light therapy really work? And what kind of results should I expect? Everyone wants to see LED red light therapy before and after photos showing great results and happy users. You can click over to our Results page to see some great Celluma before and after photos, but here is a preview of some great results to peruse. And we also want to share a little bit about how to get those amazing results for yourself.
Have a Game Plan
One of the first things you will notice in the Celluma before and after photos is that each of these individuals went into this with a defined plan for using their Celluma LED red light therapy device. Think of it like a diet and exercise routine. If you adhere to a diet one week but eat whatever you want the next, you probably aren’t going to see great results. Just like going to the gym and exercising on a regular basis is the key to staying healthy, regular use of your Celluma will get you better long-term results.
Consistency is Key

Let’s take a look at the first set of photos showing the before and after results of a young, male acne sufferer. Notice the redness of his skin and the severity of the acne on his cheek (1A). This person used Celluma’s Acne Program to deliver blue and red wavelengths just two times a week for eight weeks and just look at the after picture (1B)! There is a definite reduction in lesions, redness and inflammation. You can also see an improvement in the texture and smoothness of the skin. It’s also important to note that no other modalities were used in this young man’s treatment protocol. Sticking to a defined protocol is really going to help you get the Celluma before and after results you seek.
The Celluma Advantage
And with their shape taking and innovative design, Celluma LED light therapy devices give you the convenience and flexibility to take your treatments just about anywhere. Whether interested in anti-aging, acne or hair restoration, talk to your esthetic professional today or reach out to one of our dedicated clinical specialists so you can get the before and after results you’ve always wanted.
More Acne Results
 Let’s take a look at some more amazing acne results using Celluma light therapy devices. As you can see in this photo (2A), this woman also suffered from acne lesions on her face and chin area. Notice how red and inflamed her skin is in the before photo. Now look at photo 2B and see the difference that consistent light therapy treatments can make. This woman was treated with Celluma two times per week for eight weeks with no other modality used and you can see the just how much better her skin has improved. The redness, inflammation and lesion count is greatly reduced!
The Battle with Fine Lines & Wrinkles
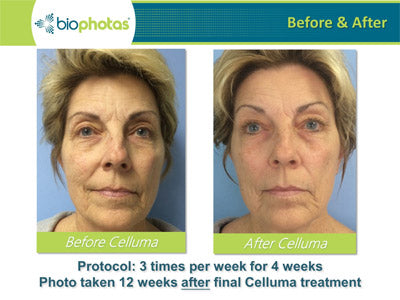
We all know the struggle against fine lines and wrinkles is real! Consistent Celluma treatments can go a long way in helping you win that battle. And it really isn’t as difficult as you might think. Take a look at picture 3A and notice the deep “laugh line” in the naso-labial fold, redness around the nose and mouth, and those under eye wrinkles. After just one 30-minute Celluma treatment, two times a week for four weeks, you can see the huge improvement in skin tone, texture, and the reduction of the redness, fine lines and wrinkles (3B). Again, no other modality was used.

Deep Knee Bruise and Tissue Repair
Celluma does more than just treat acne, fine lines and wrinkles. It can also help treat general pain conditions. Check out the deep knee bruise in picture 4A. Notice the large area it covers and the deep purple color. Now take a look at picture 4B after just one 30-minute Celluma treatment. No other modality was used and just look at how the coloring has improved after only one 30-minute Celluma treatment on the Aches & Pains setting!

Microneedling
The woman in this photo had just had a microneedling treatment. In the before photo (5A), notice the redness of her skin, the irritation and inflammation that is visible on her forehead and cheeks and the puffiness under her eyes. The second photo was taken after one 30-minute Celluma red light therapy treatment. In photo 5B, notice how the redness in the forehead is reduced and the fine lines around the nose and mouth have diminished. Even the puffiness under the eyes is now gone after only one treatment.

30 Minutes Makes a Big Impact
This next set of photos shows the amazing impact just one 30-minute treatment each day can make to a person’s skin. In photo 6A, just look at the painful redness and inflammation around the nose and mouth. Now look at photo 6B to see the incredible reduction in these symptoms, as well as the improvement in skin tone, texture, and quality. These amazing results were achieved after just one daily 30-minute treatment for 10 straight days. No other modality was used, including no antibiotics, steroids, medications or creams.


Scarring
Many people often ask if Celluma can help improve the look of scars. While Celluma red light therapy doesn’t claim to eliminate scarring, what it does do is improve the tone and texture of the skin around the scar, which can then help the scar look less pronounced. Take a look at picture 7A as an example and notice the scar below the bottom lip. Now take a look at photo 7B which was taken after four weeks of treatment with Celluma used for 30 minutes two times a week. No other modality was used. The scar is still there, but it is much less noticeable because the skin around the scar has improved so dramatically. Notice the reduction in redness, inflammation, fine lines and wrinkles.
What the Research Says
Studies have shown that red light therapy can accelerate tissue repair, decrease wound size, accelerate the resolution of erythema, accelerate wound closure and prevent dehiscence¹.
Good for Furry Family Members
Celluma red light therapy is great for pets, too! Photo 8A (after surgery but before Celluma) shows a dog that was bitten by a deadly black widow spider. The veterinarian said the dog would need to be euthanized, but the dog owner said, “no way!” The dog owner was also a Celluma owner so she asked the veterinarian to remove the necrotic tissue and she took the dog home and used her Celluma over the wound. The veterinarian used approximately 75 sutures to close the wound. Photo 8B shows the same dog almost fully recovered following the use of Celluma for six weeks.

More Tips for Great LED Light Therapy Results
No matter how fabulous the ingredients of a treatment facial mask or sheet mask may be, it will physically block the light energy from being absorbed. This is simply a law of optical physics that applies to all brands of LED devices, not just Celluma.
We have tested several of these masks, and, in some cases, the light energy was blocked 100%. Anything that is reflective or opaque will act as a barrier including sheet masks, reflective gel masks, and oily or thick substances.
While mask manufacturers often market sheet masks as “LED compatible,” we have not found any scientific research to support this claim. When we have asked the manufacturers for proof, none was ever produced. If by “compatible” they mean it “won’t do any harm,” then that could be true, but it won’t do any good as far as the benefits of light therapy which usually far outweigh the benefits of masks.
Therefore, if you find a mask that you love but also value the benefits of light therapy, then to get best results, use the mask AFTER the light therapy session.
While we’re talking about topically applied products, another myth is that LED therapy helps products to penetrate deeper into the tissue. Again, this is a myth. Wavelength determines depth of light energy penetration. There is no evidence light therapy helps topically applied products to penetrate deeper.
Great Before and After Photos Showcasing Your LED Red Light Therapy Success Stories
If you are a skin care professional, or even if you just want a reminder of how much your own skin has improved, seriously consider the following suggestions to get the absolute best before and after photos. As a professional, having powerful before and after photos can help you highlight the treatments you excel in so you can get increased referrals and even happier clients.
Step 1: The Right Equipment
The first suggestion is to make sure you have the right photography equipment at your disposal. If you have access to a quality digital camera with a 105mm lens, then you are in great shape. However, not all of us are so committed to photography that we have this kind of camera at our fingertips. Fortunately, smart phones have excellent quality cameras so just make sure you are using the same smart phone camera for all of your photos so you can maintain consistency.
Step 2: Great Lighting
The next thing to keep in mind is the lighting. For the best results, believe it not, you don’t want to use a built-in flash. It’s important to keep the light source away from your subject so you can create softer light and actually get a much clearer photo. At minimal cost, you can purchase basic photography lamps, a ring light, or an umbrella that is black on the outside and silver on the inside. You want to shoot the photo through the umbrella toward the subject. This helps you achieve ambient lighting instead of the harsher direct light, for clearer images with a softer shadow. Experts also recommend using a room with no windows or use black window coverings.
Software Investment
For high quality pictures, consider purchasing dedicated Before & After photo editing software. There are a lot of options out there depending on your needs and this type of software will actually let you compare images side-by-side.
Step 3: Prep Your Subject
Now that you have your equipment and lighting figured out, it’s time to start prepping your subject. First, you need to get your client/patient’s consent to use their before and after photos. Make sure you have a simple consent form created and have your client give consent by signing the form. Most people are very excited to showcase their amazing results!
Facial Picture Do’s & Don’ts
When taking facial pictures, make sure the skin is clean and all makeup, creams, and jewelry are removed. Ask clients to maintain a neutral expression with their eyes open but without smiling or stretching the skin too much. Hair should be pulled back away from the face either with a head band or by tying it back into a bun or pony tail. Take at least one picture of the entire face. Before posting the photo, block out the eyes. Remember, no smiling (it can stretch the skin!).
Body Photo Do’s & Don’ts
When taking photographs of the body, clients/patients should wear the same clothes for each photo session so people don’t think the photos have been altered. Ask them to wear something comfortable and loose so as not to leave any pressure marks on the skin, but make sure it is a solid color (no patterns!). Make sure the clothing doesn’t cover any part of the treated area. When photographing the groin or bikini area, make sure the patient is wearing black or dark underwear, or you can also purchase disposable and non-transparent paper underwear.
Positioning is Important
Another important step is to make sure the position is consistent, take the photo in the same location, and position the body in the exact same way in each photo. Measure and mark the distance between the camera and patient/client, and take notes for future shots.
Consistent Protocols and Accurate Records
As professionals, take care to be as realistic as possible when showing new clients your before and after images. It’s important that the client’s hopes remain realistic and that their expectations fall within the scope of your practice and style. We know that results can vary dramatically depending on a variety of factors including age, choice of protocols and aesthetic modalities, inherent health of the individual, adherence to the outlined protocol, severity of the condition to be treated, and even financial implications.
Build a Portfolio
If it is your intention to include LED red light therapy treatments within an anti-aging, acne, hair restoration or pain management program then start building a suitable portfolio by taking quality before and after photos. Keep a record of the exact program and protocols used, treatment durations, dates, etc. so it is more easily repeatable in the future.
Common Mistakes
Not using the same lighting and distance, different posture of the body or expression of the face. Smiling is a big NO.
In a Nutshell
The correct way to take perfect Before & After pictures is to use the same position, same lighting, same distance, same angle, same clothing, and same background.
Showcase Your Excellent Work
Including LED red light therapy treatments on your menu of services is an excellent way to showcase your expertize, build confidence in your practice, generate repeat customers, increase referrals and improve revenue generation. Now get snap happy!
References:
- The effects of LED emissions on sternotomy incision repair after myocardial revascularization: a randomized double-blind study with follow-upRauirys Alencar de Oliveira & Gilderlene Alves Fernandes & Andréa Conceição Gomes Lima & Antônio Dib Tajra Filho & Raimundo de Barros Araújo Jr. & Renata Amadei Nicolau Received: 2 August 2013 /Accepted: 25 November 2013 Springer-Verlag London 2013


